A stopped train in Factorio can be doing exactly what you told it to do and still be parked in the worst possible place. The junction was clear when it entered. The exit was not. Now the locomotive is waiting across another route, and your factory has acquired a very expensive roadblock.
The useful question is not simply “which light goes here?” It is “where can this train wait without trapping another one?” That question explains why ordinary rail signals and chain signals have different jobs. This guide covers their basic use in an automatic rail network, with references to the officially hosted Factorio Wiki and Wube's original explanation.
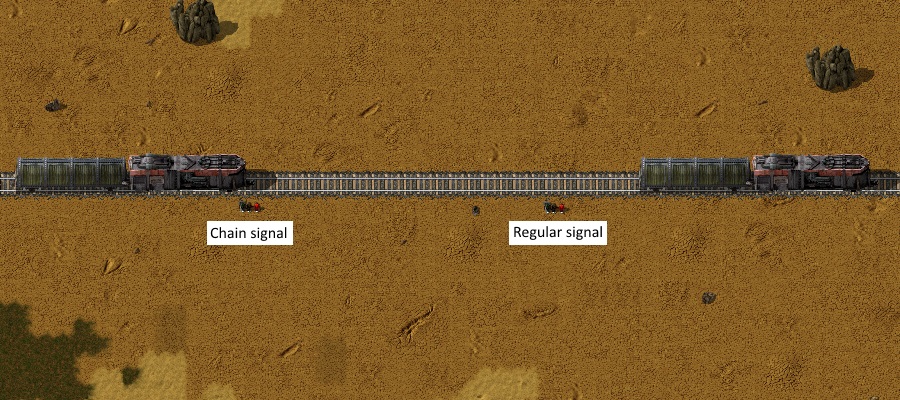
Featured image: Wube's double-crossing example from Friday Facts #81, April 10, 2015. All four images here are historical developer illustrations, not current-interface screenshots. Chain signals are identified with placeholder signs. © Wube Software.
Find the block before judging the light
A rail signal divides connected track into blocks. The rail-signal reference explains that a block can include connected rails even where a train cannot actually travel between them. Two tracks crossing visually are therefore not automatically independent pieces of traffic.
Hold a signal to see the colored block overlay. Those track colors identify separate blocks; they are not the signal lights. Follow the colored section through the junction before deciding it is empty. Looking only at the short rail directly beyond the lamp can hide the rest of the block.
A regular green signal indicates an empty monitored block. Yellow reserves it for an approaching train; red can mean occupancy or a reservation through another entrance. Red does not, by itself, prove the railway is broken. It may be successfully preventing your next collision.

An empty crossing can still be a bad place to enter
Wube's original chain-signal explanation distinguishes occupancy from a usable exit. A regular signal checks whether the train may enter the block. A chain signal also considers the exit relevant to that train's route. That lets the train wait before the shared section instead of inside it.
Imagine a loaded train heading across your main line toward a busy station. If you allow it onto the crossing before it has somewhere to go afterward, its cargo is not the problem. Its parking position is. The main line can lose access even though the waiting train has no intention of travelling along it.
That is the purpose behind the familiar placement advice: chain signals before and within a crossing, regular signals at suitable exits. The placement rule is a starting point. The reason is more useful: keep waiting trains out of places other routes need.
Give the whole train somewhere to stop
The officially hosted signal tutorial stresses train length and space between junctions. An exit is not useful merely because the locomotive clears the crossing. A waiting train's rear wagons can still occupy the previous intersection.
Plan the block after a junction's exit for the longest train using it. If two junctions are too close together, the tutorial describes alternatives including treating the intervening section with chain signals, moving the junctions farther apart or shortening the trains. Adding another lamp does not manufacture another wagon's worth of rail.
For your own inspection, follow one complete train through the arrangement on paper or on screen. Mark the point where its front would stop and where its rear would remain. Check the next crossing too. A junction can be sensible on its own and still feed into a waiting space that is too short.

Blue is a route question, not a universal stop sign
The chain-signal reference explains blue as a mixed result: some exits are available and others are not. Whether a particular train can proceed depends on its path. Another exit being free does not help a train that needs the blocked one.
Follow the intended route when diagnosing a wait. Also check the side of the rail: automatic trains follow signals on their right in the direction of travel. Bidirectional sections need appropriately opposed signals. A physically connected line can still have a direction restriction that defeats the route you intended.
This is why replacing every signal with a chain signal is a poor blanket fix. The tutorial warns that long chains can reserve more blocks and reduce throughput. You need both places that must remain clear and places where a train is allowed to wait. Design those deliberately rather than voting for one signal type everywhere.
Keep the railway question separate from the blueprint question
If the rails and machines have not actually been built, start with our Factorio blueprint and construction guide. This article addresses a different problem: a built network whose trains need sensible permission to enter shared space.
For the game itself, visit Wube's official Factorio site. For your physical collection, shop games at Zypher. If building in another sandbox appeals, check Minecraft for Nintendo Switch. It is a different game, not a physical Factorio release or a promise of identical railway systems. Read the selected condition and included contents, or sell your old games to Zypher.
Sources, native product listing and Wube's website-asset permission checked November 7, 2026. Historical screenshots are used unchanged. Layout-inspection advice is Zypher editorial guidance; no firsthand testing, guaranteed deadlock cure or new-update announcement is claimed.