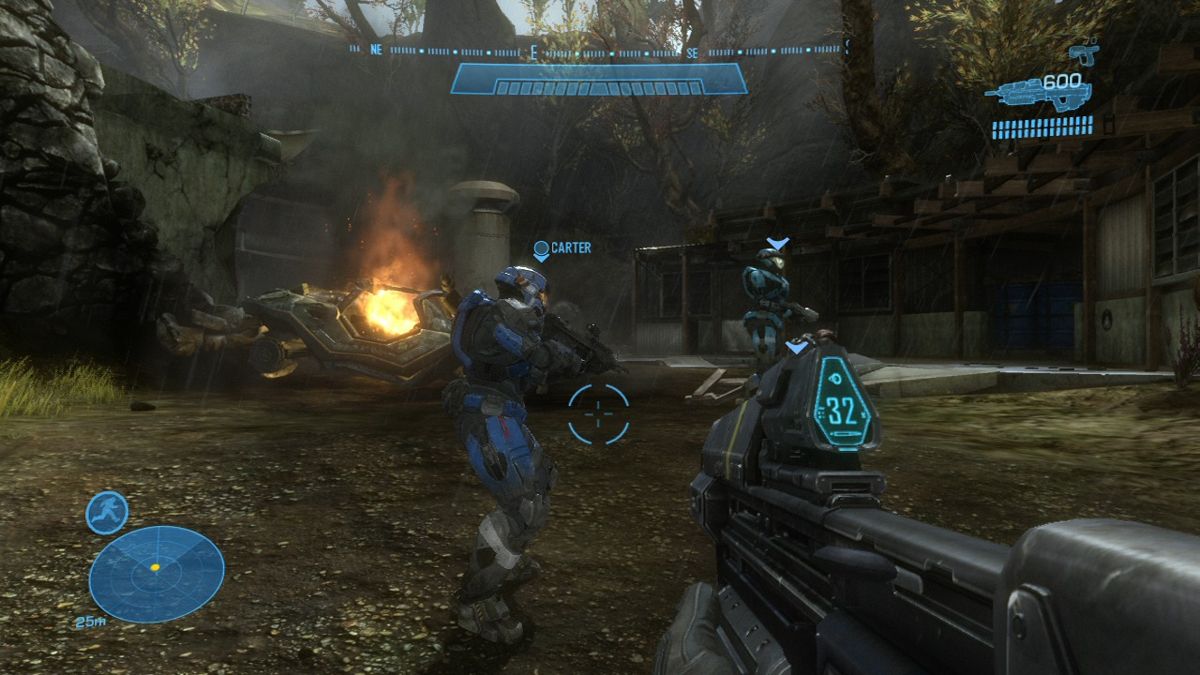
The shooting stops, your shield begins to recover, and it is tempting to charge straight into the next part of Halo: Reach. Take one more look at the HUD first. Shield strength and body health are separate readings, and the fuller-looking bar is not the whole condition of your Spartan.
This guide concerns the original Xbox 360 campaign. Its purpose is to make the quiet moments between exchanges useful: check your condition, read the available information and enter the next fight with a more complete picture.

Read health and shields together
The original Microsoft-hosted manual identifies shield strength and body health separately. It describes the shield as fully rechargeable while warning that significant injuries may prevent full short-term recovery.
That distinction changes the decision after an exchange. Waiting for the shield is useful, but it does not make a glance at health unnecessary. Before leaving cover, check both readings and decide whether the next route gives you a reasonable place to recover again.
Our practical suggestion is to make that glance part of the same habit as checking ammunition. You are not stopping to study a dashboard for a minute. You are making sure that the resources you are about to rely on are actually there.

Do the ammunition check before the doorway
The manual places the active weapon and secondary weapon in the same HUD area, with the active one larger. It also describes campaign ammunition pickups from crates and from weapons of the same type.
Look at what both weapons can contribute before entering a tighter space. If your familiar weapon is short on ammunition, make that a conscious part of the approach. A backup only helps if you remember it is available before the first option runs dry.
There is a difference between having ammunition somewhere in the loadout and having a useful action ready for the next few seconds. Check the weapon you are holding, the alternative and the route to any visible resupply. Then leave the menu-free moment behind and get back to the fight.

The motion tracker adds height to the picture
Reach’s manual describes the tracker as showing nearby friendly and hostile units along with their elevation relative to you. It is useful information when a battle has more than one floor or a path continues above your current position.
Use it alongside the view, rather than as a replacement for looking around. A nearby indication gives you something to investigate. The geometry still determines whether the unit has a line of fire, whether you have a route to it and where cover sits between you.
When an encounter feels more crowded than it first looked, take a second to reconcile the tracker with the space. Check an upper level or the side of a doorway before assuming every threat is directly ahead.

Match the weapon’s job to the target
The manual describes plasma weapons as effective against shields and notes the plasma pistol’s overcharge behavior. It separately describes the shotgun as most effective at close range. Those descriptions give you concrete reasons to change the approach rather than treating every pickup as the same gun with a new sound.
You do not need to memorize every specification before enjoying the campaign. Begin with the distinction that matters in the encounter you can see. Is distance the problem? Is the target shielded? Does the next room give a close-range weapon space to do its work?
A useful swap solves a recognizable problem. If you cannot name what the new weapon is meant to help with, spend a brief, low-pressure moment learning it before relying on it at the hardest part of an exchange.

Leave cover with a destination
The next piece of cover is part of the decision to move. Identify where you mean to arrive and what you expect to see from there. A sprint into open ground can create a new problem even when the first few steps feel like an escape.
For a suggested recovery routine, check condition, ammunition and nearby space in that order. Then choose the next movement. The point is to connect the HUD to a decision, rather than simply noticing that several meters exist.
A plasma weapon adds another resource to watch: heat. The manual identifies overheating on the plasma pistol and rifle, and a venting action on the plasma repeater. If that is the weapon you have chosen for a shielded target, include its readiness in the glance before you move. The useful firing position is the one you can reach with a usable weapon.

Keep the original edition’s services in context
Halo Support’s legacy-service notice separates surviving campaign and offline features from retired Xbox 360 online services. Playing the original software through backward compatibility does not restore those retired server features.
Check Zypher’s Halo: Reach Xbox 360 listing for the offered copy’s condition and contents. If you are making space for Noble Team, start with our sell-your-old-games page.